Table of Contents
This tutorial shows how to improve the performance of the remote pipeline that builds a Docker image using docker build, which takes 15 minutes to 20 seconds.
Note: Although Google’s Cloud Build is used here, this solution can be applied in GitHub Actions, Azure Pipeline, or any pipeline-driven Docker builds.
The Challenge with Docker Build
Given the following Google’s Cloud Build script:
# cloudbuild.yml

steps:
  - name: gcr.io/cloud-builders/docker
    args: ["build", "-t", "${_NAME}", "."]

images:
  - ${_NAME}

substitutions:
  _LOCATION: us-central1
  _REPO: shared
  _IMAGE: chatbot
  _NAME: ${_LOCATION}-docker.pkg.dev/${PROJECT_ID}/${_REPO}/${_IMAGE}

options:
  logging: CLOUD_LOGGING_ONLY
  machineType: E2_HIGHCPU_32
  dynamicSubstitutions: true
When kicking off the build…
gcloud builds submit --config=cloudbuild.yml --project=[PROJECT ID]
… Docker builds the image successfully and pushes it to the Artifact Registry.
When rerunning the same build multiple times, it takes similar time to run:

In the example above, building the image with no changes to the Dockerfile takes an average of 15 minutes.
Solution
When running the build locally, Docker takes advantage of the layer caching by storing the data in the file system. This results in faster subsequent builds.
However, when using a remote pipeline, the agent assigned to the pipeline job is ephemeral. Hence, Docker must always rebuild all layers, resulting in a long build time. To fix this annoyance, we must instruct Docker to cache the layers elsewhere.
Introducing Buildx
Docker has a relatively unheard CLI command called Buildx that allows the layers to be cached remotely. Buildx has been the default build client since Docker Engine 23.0 and Docker Desktop 4.19.
To investigate, run the following commands locally to verify:
$ docker --version
Docker version 25.0.3, build 4debf41

$ docker build --help
Usage:  docker buildx build [OPTIONS] PATH | URL | -

// TRUNCATED
Step 1: Enable experimental mode
At the time of writing, Google’s Cloud Build uses a Docker version older than v23.0.

Hence, an environment variable must be set to enable the experimental mode when using an older Docker version.
# cloudbuild.yml

options:
  logging: CLOUD_LOGGING_ONLY
  machineType: E2_HIGHCPU_32
  dynamicSubstitutions: true
  env:
    - DOCKER_CLI_EXPERIMENTAL=enabled
Step 2: Specify build driver
A different Docker driver must be explicitly specified to use the layer caching feature in the older Docker version.
# cloudbuild.yml

steps:
  - name: gcr.io/cloud-builders/docker
    entrypoint: bash
    args:
      - -c
      - >-
        docker buildx create
        --driver docker-container
        --use
Step 3: Configure build caches
Now, configure Docker to fetch and store the caches.
# cloudbuild.yml

steps:
  # ...

  - name: gcr.io/cloud-builders/docker
    entrypoint: bash
    args:
      - -c
      - >-
        docker buildx build
        --cache-from ${_NAME}:cache
        --cache-to type=registry,ref=${_NAME}:cache,mode=max
        -t ${_NAME} .
        --push
In this example, the cache image is stored in the same image repository in Artifact Registry but with a different tag, cache.
To ensure all layers’ build information is cached, mode=max is specified, too.
Step 4: Putting everything together
The modified build file looks like this:
# cloudbuild.yml

steps:
  - name: gcr.io/cloud-builders/docker
    entrypoint: bash
    args:
      - -c
      - >-
        docker buildx create
        --driver docker-container
        --use

  - name: gcr.io/cloud-builders/docker
    entrypoint: bash
    args:
      - -c
      - >-
        docker buildx build
        --cache-from ${_NAME}:cache
        --cache-to type=registry,ref=${_NAME}:cache,mode=max
        -t ${_NAME} .
        --push

substitutions:
  _LOCATION: us-central1
  _REPO: shared
  _IMAGE: chatbot
  _NAME: ${_LOCATION}-docker.pkg.dev/${PROJECT_ID}/${_REPO}/${_IMAGE}

options:
  logging: CLOUD_LOGGING_ONLY
  machineType: E2_HIGHCPU_32
  dynamicSubstitutions: true
  env:
    - DOCKER_CLI_EXPERIMENTAL=enabled
Step 5: Analyze build results
Now, submit the build multiple times to examine the results.
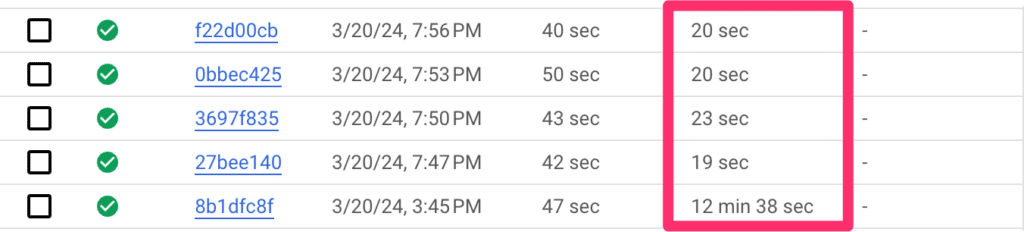
The build logs show that the first run takes about 12 minutes because the cache has yet to exist. Once the cache exists, the subsequent build takes an average of 20 seconds.
The reason for the gap between 4 PM and 7 PM was that nobody had the time to sit for 12 minutes for the build to finish.

Step 6: Verify image repository
The images stored in the Artifact Registry look like this:
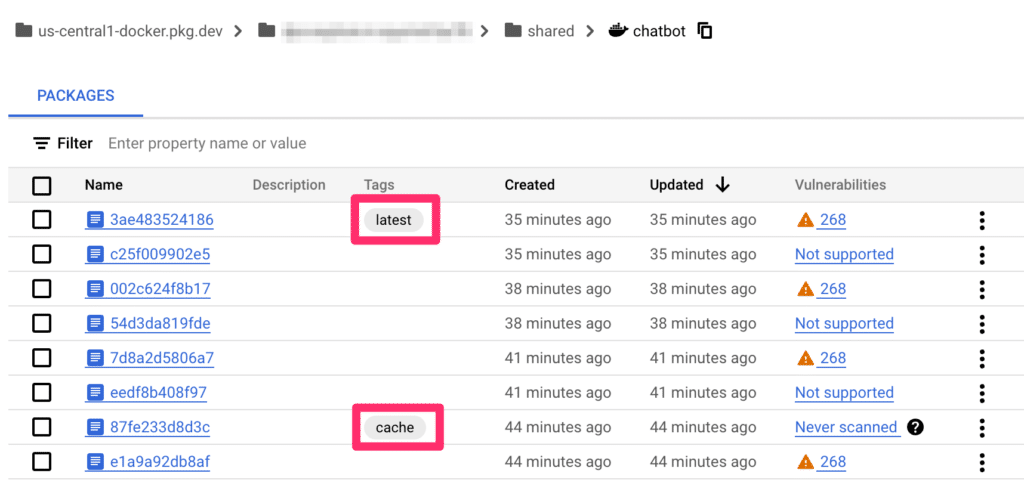
As you can see, the final image (with the latest tag) and the cache image (with the cache tag) are successfully stored in the Artifact Registry. The 20-second build is exclusively spent pulling a few gigabytes of cache image from the Artifact Registry.
Leave a Reply